# 移除链表元素
题目链接🔗
两种操作方式:
- 直接使用原来的链表进行操作
- 需要考虑删除头节点时的处理
- 设置一个虚拟头结点再进行操作
- 所有节点统一处理
# 使用原来的链表
- 非头结点:通过前一个节点来移除当前节点
- 头结点:将头结点向后移动一位
class Solution { | |
public: | |
ListNode* removeElements(ListNode* head, int val) { | |
// 删除头结点 | |
while (head != NULL && head->val == val) { // 注意这里不是 if | |
ListNode* tmp = head; | |
head = head->next; | |
delete tmp; | |
} | |
// 删除非头结点 | |
ListNode* cur = head; | |
while (cur != NULL && cur->next!= NULL) { | |
if (cur->next->val == val) { | |
ListNode* tmp = cur->next; | |
cur->next = cur->next->next; | |
delete tmp; | |
} else { | |
cur = cur->next; | |
} | |
} | |
return head; | |
} | |
}; |
# 虚拟头节点
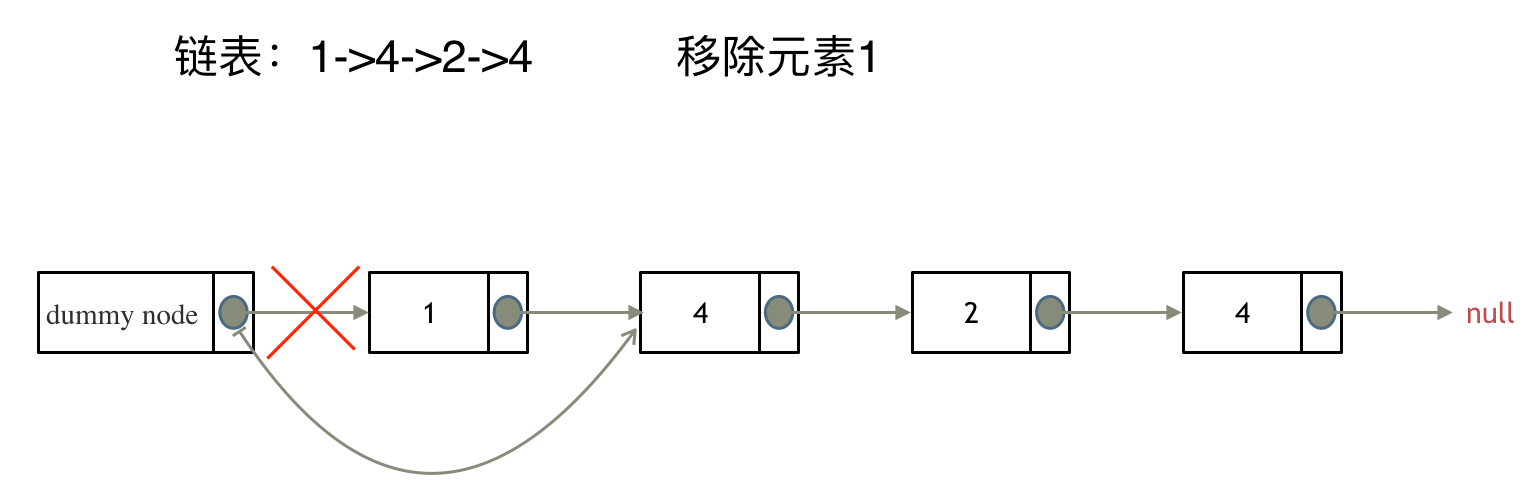
给链表添加一个虚拟头结点为新的头节点,此时如要移除的旧头节点和其他节点方式一致,统一了逻辑。
class Solution { | |
public: | |
ListNode* removeElements(ListNode* head, int val) { | |
ListNode* dummyHead = new ListNode(0); // 虚拟头节点 | |
dummyHead->next = head; | |
ListNode* cur = dummyHead; | |
while(cur->next != nullptr) { | |
if(cur->next->val == val){ | |
ListNode* tmp = cur->next; | |
cur->next = cur->next->next; | |
delete tmp; | |
} | |
else{ | |
cur = cur->next; | |
} | |
} | |
head = dummyHead->next; | |
delete dummyHead; | |
return head; | |
} | |
}; |
# 注意事项
报错:runtime error: member access within null pointer of type 'ListNode' (solution.cpp)
while(cur->next != nullptr) { | |
if(cur->next->val == val){ | |
ListNode* tmp = cur->next; | |
cur->next = cur->next->next; | |
delete tmp; | |
} | |
cur = cur->next; // 逻辑有问题 | |
} |
上面的 while 判断条件只能判断 cur->next 不为空,没办法判断 cur->next->next 是否为空。若进入 if 中,会执行 cur->next = cur->next->next ,也就是说此时 cur 的后继节点变成了 cur->next->next ,那么我在下面更新 cur 时就是直接把 cur 更新到 cur->next->next ,但是在上面我只判断了 cur->next 是否为空,并没有判断 cur->next->next 是否为空,这就会出现 cur->next->next 为空的情况下被更新为 cur,也就是 cur 变成 nullptr 了。
更正如下:
while(cur->next != nullptr) { | |
if(cur->next->val == val){ | |
ListNode* tmp = cur->next; | |
cur->next = cur->next->next; | |
delete tmp; | |
} | |
/* 注意改动 */ | |
else { | |
cur = cur->next; | |
} | |
} |
# 设计链表
题目链接🔗
class MyLinkedList { | |
public: | |
struct ListNode { | |
int val; | |
ListNode* next; | |
ListNode(int val):val(val), next(nullptr){} | |
}; | |
/* 初始化 */ | |
MyLinkedList() { | |
_dummyHead = new ListNode(0); // 这里定义的头结点 是一个虚拟头结点,而不是真正的链表头结点 | |
_size = 0; | |
} | |
/* 获取链表中下标为 index 的节点的值。如果下标无效,则返回 -1 */ | |
int get(int index) { | |
if(index > (_size - 1) || index < 0) return -1; | |
ListNode* cur = _dummyHead->next; | |
while(index--) { | |
cur = cur->next; | |
} | |
return cur->val; | |
} | |
/* 将一个值为 val 的节点插入到链表中第一个元素之前 */ | |
void addAtHead(int val) { | |
ListNode* newHead = new ListNode(val); | |
newHead->next = _dummyHead->next; | |
_dummyHead->next = newHead; | |
_size++; | |
} | |
/* 将一个值为 val 的节点追加到链表中作为链表的最后一个元素。 */ | |
void addAtTail(int val) { | |
ListNode* cur = _dummyHead; | |
ListNode* newTail = new ListNode(val); | |
while(cur->next != nullptr) { | |
cur = cur->next; | |
} | |
cur->next = newTail; | |
_size++; | |
} | |
/** | |
* 在第 index 个节点之前插入一个新节点,例如 index 为 0,那么新插入的节点为链表的新头节点。 | |
* 如果 index 等于链表的长度,则说明是新插入的节点为链表的尾结点 | |
* 如果 index 大于链表的长度,则返回空 | |
* 如果 index 小于 0,则在头部插入节点 | |
*/ | |
void addAtIndex(int index, int val) { | |
if(index > _size) return; | |
if(index < 0) index = 0; | |
ListNode* newNode = new ListNode(val); | |
ListNode* cur = _dummyHead; | |
while(index--) { | |
cur = cur->next; | |
} | |
newNode->next = cur->next; | |
cur->next = newNode; | |
_size++; | |
} | |
/* 如果下标有效,则删除链表中下标为 index 的节点。注意 index 是从 0 开始的 */ | |
void deleteAtIndex(int index) { | |
if (index >= _size || index < 0) return; | |
ListNode* cur = _dummyHead; | |
while(index--) { | |
cur = cur ->next; | |
} | |
ListNode* tmp = cur->next; | |
cur->next = cur->next->next; | |
delete tmp; | |
//delete 命令指示释放了 tmp 指针原本所指的那部分内存, | |
// 被 delete 后的指针 tmp 的值(地址)并非就是 NULL,而是随机值。也就是被 delete 后, | |
// 如果不再加上一句 tmp=nullptr,tmp 会成为乱指的野指针 | |
// 如果之后的程序不小心使用了 tmp,会指向难以预想的内存空间 | |
tmp=nullptr; | |
_size--; | |
} | |
private: | |
int _size; | |
ListNode* _dummyHead; | |
}; |
如果将 ListNode* dummyNode 定义在结构体 struct ListNode 之前,在编译时就会出现以下报错:error: incompatible pointer types assigning to 'ListNode *' from 'MyLinkedList::ListNode *'
new ListNode (0) 是 MyLinkedList::ListNode * 类型,而 dummyNode 被识别成了 ListNode * 类型,因为在类 MyLinkedList 定义 struct ListNode 之前就定义了 dummyNode。
# 反转链表
题目链接🔗
我们拿有示例中的链表来举例,如动画所示:(纠正:动画应该是先移动 pre,在移动 cur)
# 双指针法
首先定义一个 cur 指针,指向头结点,再定义一个 pre 指针,初始化为 null。
然后就要开始反转了,首先要把 cur->next 节点用 tmp 指针保存一下,也就是保存一下这个节点。
为什么要保存一下这个节点呢,因为接下来要改变 cur->next 的指向了,将 cur->next 指向 pre ,此时已经反转了第一个节点了。
接下来,就是循环走如下代码逻辑了,继续移动 pre 和 cur 指针。
最后,cur 指针已经指向了 null,循环结束,链表也反转完毕了。 此时我们 return pre 指针就可以了,pre 指针就指向了新的头结点。
class Solution { | |
public: | |
ListNode* reverseList(ListNode* head) { | |
ListNode* temp; // 保存 cur 的下一个节点 | |
ListNode* cur = head; | |
ListNode* pre = nullptr; | |
while(cur) { | |
temp = cur->next; | |
cur->next = pre; | |
pre = cur; | |
cur = temp; | |
} | |
return pre; | |
} | |
}; |
# 递归
递归法相对抽象一些,但是其实和双指针法是一样的逻辑,同样是当 cur 为空的时候循环结束,不断将 cur 指向 pre 的过程。
关键是初始化的地方,双指针法中初始化 cur = head,pre = NULL,在递归法中可以从如下代码看出初始化的逻辑也是一样的,只不过写法变了。
class Solution { | |
public: | |
ListNode* reverse(ListNode* pre,ListNode* cur){ | |
if(cur == NULL) return pre; | |
ListNode* temp = cur->next; | |
cur->next = pre; | |
// 可以和双指针法的代码进行对比,如下递归的写法,其实就是做了这两步 | |
// pre = cur; | |
// cur = temp; | |
return reverse(cur,temp); | |
} | |
ListNode* reverseList(ListNode* head) { | |
// 和双指针法初始化是一样的逻辑 | |
// ListNode* cur = head; | |
// ListNode* pre = NULL; | |
return reverse(NULL, head); | |
} | |
}; |